Working with Geometries in ArcPy


Today We Are Going To Talk About Geometries!

In Arc GIS, we can use Python scripting through ArcPy to read geometry data and write the data to text files, csv's, or other file types. This is extremely helpful when trying to draw geometries in applications and mapping systems. 

The Python script that I created in this coding example takes a shapefile containing rivers (polylines of rivers) over an area and copies the rivers from the shapefile to a text file. This is extremely useful because we can share this text file with another GIS analyst, geocode these XY points to another map, run queries to analyze the data, and copy the data to other formats for web applications, dashboards, etc...

Sounds Simple Right? I promise you its not...

Let's go over the following things we need to do to make this happen:

  • import our modules and set up our workspace
  • create a text file called rivers text file
  • create a search cursor to iterate through our rivers shapefile
  • write some of the metadata from our shapefile to the text file
    • We want the rivers name's, X and Y coordinates, Object ID's, and a vector ID
    • Each river from the shapefile needs to have its own line in the text file
Rivers are shown in purple

Pseudocode...

# Import all modules

# Enable the overwrite Output setting

# Set the workspace


# Prepare to write .txt file. Create riversTxtName with file path

# (open) riversTxtName.txt file for writing ("w")


# Define river shapefile to file path as a variable, set to infc


# Create search cursor for infc(rivers.shp). The cursor should call on the OID, SHAPE, and NAME fields.


    # Set for loop: for every row in the cursor

        # Create the vertex id at 0

              # For every point in the rows shape attribute at the first element" aka using get part method

                            # Add 1 to your vertex ID number --- In other words increment the vertex id by 1"

                             # Now we will write our rivers, including the id, vertex id, coordinates and the name

                            # add 1 to vertex ID

                            # Print point out to check and make sure we have the right coord’s

                            # Add a line to your .txt file using the .write() method. Need to str() aka stringify

                            # write to txt file from rivers object id

                            # write to txt file from rivers vertex id

                             # write to txt file from rivers x point

                             # write to txt file from rivers point Y

                             # write to txt file from rivers Name – index field of name

                             # Put break “\n”

# del cursor

# close rivers txt file
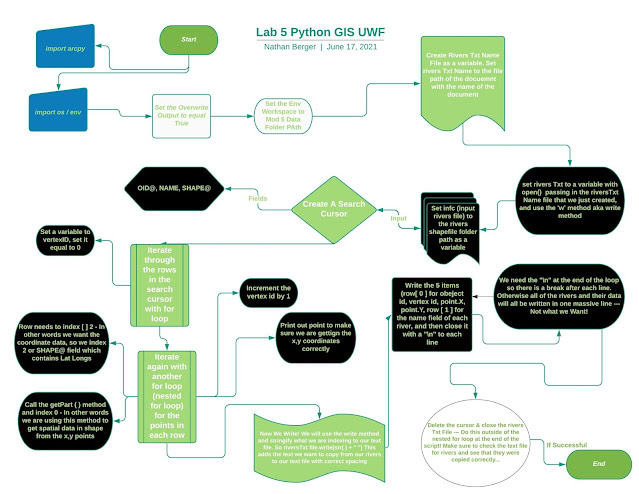
Refer To The Flow Chart Below...


Refer To These Sources For ArcPy Documentation


https://pro.arcgis.com/en/pro-app/latest/arcpy/get-started/reading-geometries.htm

https://pro.arcgis.com/en/pro-app/latest/arcpy/functions/searchcursor.htm


First Thing is to open your Python IDE with ArcPy, create a py file, import modules, and set your workspace file path to the rivers 


Then Create Your Text file for rivers so we can copy the data from the shapefile to the text file!


Then we create a Search cursor to iterate through our rivers! We want to pull the OID@, SHAPE@, and NAME fields from our rivers shapefile attribute table when creating our search cursor...


Then We Copy Our Data by using the Write Method. We want to copy 5 elements of data to one line in our text file. This means that when we open our text file of rivers, we should see that each river gets it's own line, and each line has 5 columns of data. The Object ID, Vector ID, X Coord (Longitude), Y Coord (Latitude, and the Name of the River). 


Nested For Loop:

In order to run this search cursor to write the data to our text file, we need toi use a for loop. More specifcally, we need to use a nested for loop, which is multiple for loops inside one another. 

We also need to use the getPArt ( ) method so that we don't have to use 3 for loops like the example below...


for row in cursor:

for part in row:

for point in part: 

The getPArt ( ) method allows us to sort of skip a for loop by doing for point in row [ ] .getPArt( ) to obtain the shape data of the X and Y coordinates of each point in each river. The geometry object of SHAPE@ which is a field in our rivers shapefile, stores this point data of Lat Longs. 

Once we complete our for loop by writing the 5 data elements, we get the following...


Look At our Rivers Text file below when the copying is done!

            
                                                                    Terminal Output:


PDF File:

And that is how to copy data from your shapefile to a text file. We were able to copy geometry data of points in parts of each row in a shapefile. We copied the names, id's, and overall formatted the txt file so that it is legible and easy to understand. This is a great example of how we can share geospatial data not just in text files but in many other formats as well. 

Check This Video Out On YouTube 

To See Some More Ex's Of Reading / Writing Geometry In ArcPy


Don't Forget To Subscribe!


Comments

Popular posts from this blog

TIN's vs. DEM's: 3D Elevation Models In Arc GIS Pro

Isarithmic Mapping: Annual Rainfall in Washington

Ward 7 Public Schools in Washington D.C.